i dont understand the question, cause it doesnt for meKaplowitz wrote:Whenever i try to type more than one line in Photoshop, the text overlaps. How do you type more than one line?
Map-Making Q&A
Moderator: Cartographers
Forum rules
Please read the Community Guidelines before posting.
Please read the Community Guidelines before posting.
-
WidowMakers
- Posts: 2774
- Joined: Mon Nov 20, 2006 9:25 am
- Gender: Male
- Location: Detroit, MI
Is this what is happening?Kaplowitz wrote:Whenever i try to type more than one line in Photoshop, the text overlaps. How do you type more than one line?
You want to type like the top text, but the text overlaps like the bottom.
Adjust your leading in the character panel in photoshop
TOP: Proper Leading in Photoshop (Character size 30, leading 36)

BOTTOM: Improper Leading in Photoshop (Character size 30, leading 11)
WM

Re: Q&A: Map Making TTT (Tips, Tricks & Tutorials)
Okay Dokay...
So here's my map making question. I've been working on the QWERTY keyboard map, I'm using Photoshop CS2... now, all I've ever really done with photoshop is photo editing, and I'm reasonably good at that and know a few tricks, but for the process of image -creation- I've had little to no experience...
One thing that was brought up was that I should start the image from scratch, and build it up all with photoshop, but I have no idea how to go about doing this, and making it look realistic rather than solid colour and ugly as all tries I've had so far have been. Could anyone offer advice or suggestions on where to start were I to build this map up from scratch?
http://www.conquerclub.com/forum/viewtopic.php?t=41027 is the current version (adapted from a photo image)
-
gimil

- Posts: 8599
- Joined: Sat Mar 03, 2007 12:42 pm
- Gender: Male
- Location: United Kingdom (Scotland)
Re: Q&A: Map Making TTT (Tips, Tricks & Tutorials)
Depends what type of map you want to make. Geographical? Or something more inventive?
What do you know about map making, bitch?
Top Score:2403natty_dread wrote:I was wrong
Re: Q&A: Map Making TTT (Tips, Tricks & Tutorials)
how do u see/select different layers to work on in GIMP???

Re:
WidowMakers wrote:Is this what is happening?Kaplowitz wrote:Whenever i try to type more than one line in Photoshop, the text overlaps. How do you type more than one line?
You want to type like the top text, but the text overlaps like the bottom.
Adjust your leading in the character panel in photoshop
TOP: Proper Leading in Photoshop (Character size 30, leading 36)
BOTTOM: Improper Leading in Photoshop (Character size 30, leading 11)
WM
Yea that was it, i fixed it by accident! On PSP, 0 was normal, and negatives were bad, so it was a bit confusing. Thanks anyway, now i know what i did so it wont happen again.

-
brendan man

- Posts: 354
- Joined: Sun Dec 30, 2007 12:17 pm
- Gender: Male
Re: Q&A: Map Making TTT (Tips, Tricks & Tutorials)
Do you have to pay to download gimp?
-
DiM

- Posts: 10415
- Joined: Wed Feb 14, 2007 6:20 pm
- Gender: Male
- Location: making maps for scooby snacks
Re: Q&A: Map Making TTT (Tips, Tricks & Tutorials)
brendan man wrote:Do you have to pay to download gimp?
nope. gimp is free
“In the beginning God said, the four-dimensional divergence of an antisymmetric, second rank tensor equals zero, and there was light, and it was good. And on the seventh day he rested.”- Michio Kaku
-
DiM
- Posts: 10415
- Joined: Wed Feb 14, 2007 6:20 pm
- Gender: Male
- Location: making maps for scooby snacks
Re: Q&A: Map Making TTT (Tips, Tricks & Tutorials)
DiM wrote:never underestimate the power of personalized brushes. create a shape of how you think a tree looks from above. let's say a star shape. now take that brush and set the background and foreground to 2 foliage colours (dark green and yellowy green) then do the following:
shape dynamics>
> size jitter 100%
> minimum diameter 0%
> angle jitter 0%
> roundness jitter 68%
> min roundness 25%
scatter> adjust as you please dependng on what you need
colour dynamics>
>fore/back 100%
> saturation 50%
the rest at 0%
and check smoothing.
then go ahead and paint what you need adjusting the brush size according to the height of the viewpoint.
after you paint put on some drop shadow and even bevel if it suits your need. but keep the bevel at a minimum.
here's a quick example. i didn't bother making a custom shape so i used a flower one. it looks rather bad on large trees but it works for small ones as the details are hard to spot.
and here's the file http://www.sendspace.com/file/9g965g
Last edited by DiM on Tue May 13, 2008 7:33 am, edited 1 time in total.
“In the beginning God said, the four-dimensional divergence of an antisymmetric, second rank tensor equals zero, and there was light, and it was good. And on the seventh day he rested.”- Michio Kaku
Re: Q&A: Map Making TTT (Tips, Tricks & Tutorials)
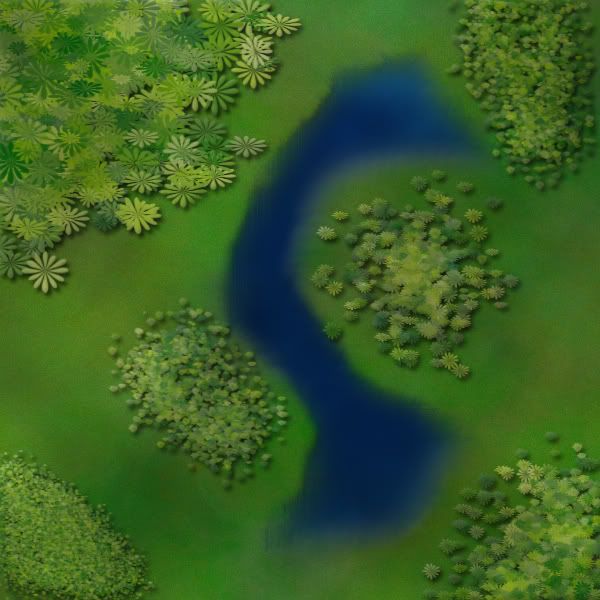
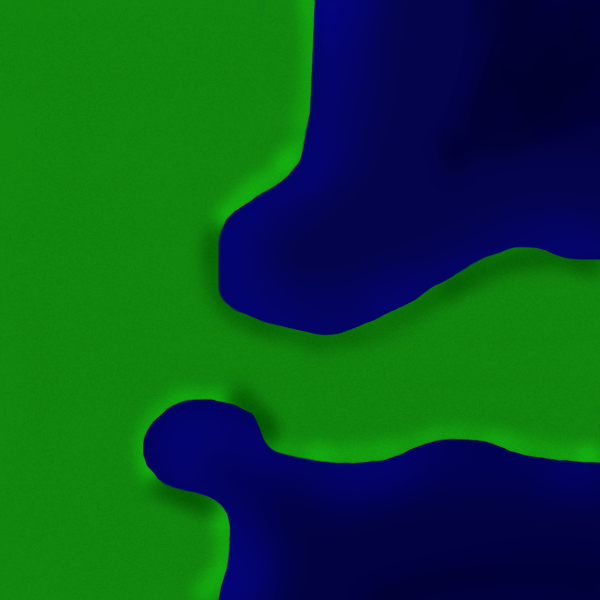
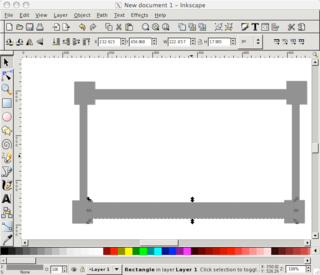
ok i had some free time, and recently i figured out how to make a decent looking landscape with inkscape, ill include a picture i drew up 5 minutes ago at the end.
OK first, open X-11 and Inkscape
Click the Rectangles and Squares tool
Make a box, it can be any size
Choose a color for the box from the color swatch (the thing at the bottom of inkscape that has all the many colors you can use), for this example im using green.
Now using the Freehand tool, carefully draw some water onto the map, and give it a nice looking blue color. (You dont have to create a new layer for this, since Inkscape uses layers inside of layers)
After thats done, decide where your light source will be, for this example im using the lower right corner
Now draw along the coast of the water, just a little on the land and a little in the water
Now if that side is facing towards your light source, fill it with al lighter color than your square (so if your square is green, make what you just made light green) If it is facing away from your light source, make it darker than your square (dark green if your square is green)
Repeat until u have done that for the entire coastline
Now if you have done that correct it will look crappy so far. But dont worry, we're gonna fix that.
Click your lightened and darkened areas, and using the lower selection along the top bar, move it until it is under the water, yet still visible on the land. Do that for all the coast
Now it should look a little better, but not all that good, but dont worry this is the final step
Click a lightened or darkened area, and in the upper right corner of inkscape, click the little paintbrush (it will be next to a T)
Now once u have clicked that, using the sliding bar that is under Blur, modify the blur until it looks good (i use about 12.5%)
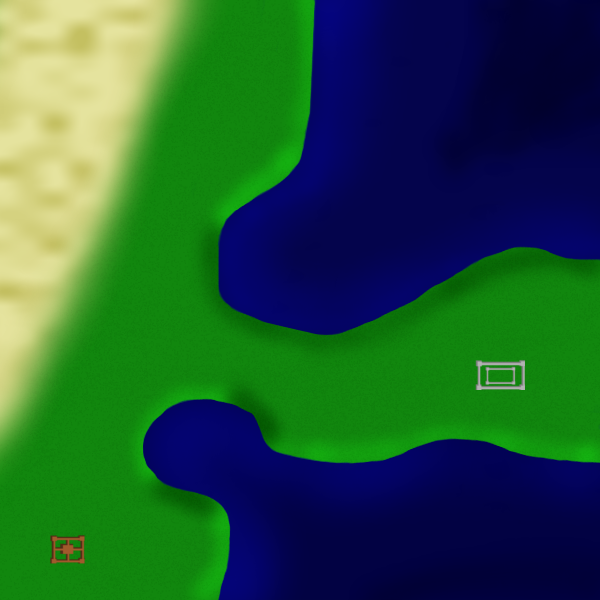
Now repeat that for each of the lightened/darkened areas, and if u did it right, it should look something like this:
hope thats not to confusing
OK first, open X-11 and Inkscape
Click the Rectangles and Squares tool
Make a box, it can be any size
Choose a color for the box from the color swatch (the thing at the bottom of inkscape that has all the many colors you can use), for this example im using green.
Now using the Freehand tool, carefully draw some water onto the map, and give it a nice looking blue color. (You dont have to create a new layer for this, since Inkscape uses layers inside of layers)
After thats done, decide where your light source will be, for this example im using the lower right corner
Now draw along the coast of the water, just a little on the land and a little in the water
Now if that side is facing towards your light source, fill it with al lighter color than your square (so if your square is green, make what you just made light green) If it is facing away from your light source, make it darker than your square (dark green if your square is green)
Repeat until u have done that for the entire coastline
Now if you have done that correct it will look crappy so far. But dont worry, we're gonna fix that.
Click your lightened and darkened areas, and using the lower selection along the top bar, move it until it is under the water, yet still visible on the land. Do that for all the coast
Now it should look a little better, but not all that good, but dont worry this is the final step
Click a lightened or darkened area, and in the upper right corner of inkscape, click the little paintbrush (it will be next to a T)
Now once u have clicked that, using the sliding bar that is under Blur, modify the blur until it looks good (i use about 12.5%)
Now repeat that for each of the lightened/darkened areas, and if u did it right, it should look something like this:
hope thats not to confusing
Re: Q&A: Map Making TTT (Tips, Tricks & Tutorials)
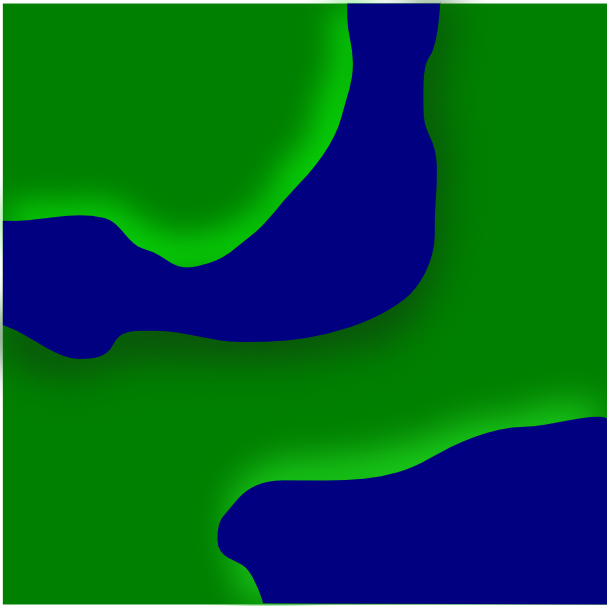
OK same landscaping thing as before, but in the GIMP this time 
OK open GIMP
Create a new image, im using 600x600 for this one
Click the Paintbrush tool, choose a nice color (green again this time) and fill the whole picture with it (or if your lazy just use the Bucket Fill tool)
Now create a new layer, and on this layer, draw some water, i suggest using a large brush to get the basic area, and then zooming in to 400% or more and using a smaller brush and smoothing it out
Once thats done, choose your light source (lower right corner again here)
Now create a layer BELOW the water layer, but above the grass layer
Now choose wether your gonna start with the areas getting hit by light, or in the shadows.
Once you've chosen, if u chose the shadowed area, then grab the Airbrush tool and set the color on it to black or dark green. Then select a Circle Fuzzy Airbrush and change the pressure to 10, and the rate to 88. Now start coloring along the shore parts that are facing AWAY from your light source.
Once done, if u chose your grass color to be green, then keep the same airbrush, but change the color to light green. And then do the same thing that u did for the shadowed areas, but do it to the areas facing TOWARDS the light source.
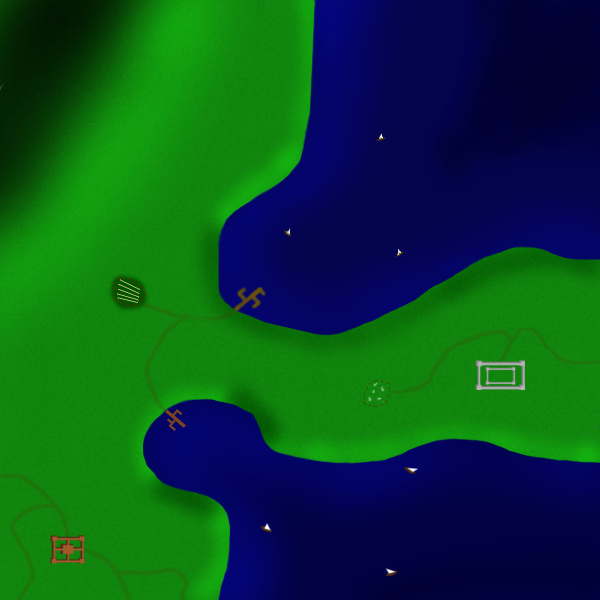
Now if u did it right, it should look something like this:
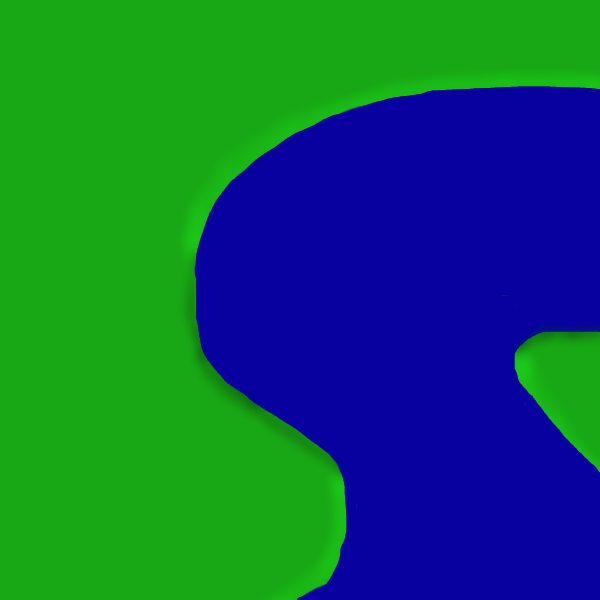
Remember, i spent like 5 minutes drawing this, so if u work at it longer u could get better looking results
Also, for airbrush sizes, i suggest using:
Circle Fuzzy (19)
and on the scale bar, move it up to 2.21
Hope this helps
OK open GIMP
Create a new image, im using 600x600 for this one
Click the Paintbrush tool, choose a nice color (green again this time) and fill the whole picture with it (or if your lazy just use the Bucket Fill tool)
Now create a new layer, and on this layer, draw some water, i suggest using a large brush to get the basic area, and then zooming in to 400% or more and using a smaller brush and smoothing it out
Once thats done, choose your light source (lower right corner again here)
Now create a layer BELOW the water layer, but above the grass layer
Now choose wether your gonna start with the areas getting hit by light, or in the shadows.
Once you've chosen, if u chose the shadowed area, then grab the Airbrush tool and set the color on it to black or dark green. Then select a Circle Fuzzy Airbrush and change the pressure to 10, and the rate to 88. Now start coloring along the shore parts that are facing AWAY from your light source.
Once done, if u chose your grass color to be green, then keep the same airbrush, but change the color to light green. And then do the same thing that u did for the shadowed areas, but do it to the areas facing TOWARDS the light source.
Now if u did it right, it should look something like this:
Remember, i spent like 5 minutes drawing this, so if u work at it longer u could get better looking results
Also, for airbrush sizes, i suggest using:
Circle Fuzzy (19)
and on the scale bar, move it up to 2.21
Hope this helps
-
DiM
- Posts: 10415
- Joined: Wed Feb 14, 2007 6:20 pm
- Gender: Male
- Location: making maps for scooby snacks
Re: Q&A: Map Making TTT (Tips, Tricks & Tutorials)
extend both tutorials by applying grain on the land (to give it a grassy feel) and add depth to the water and land by using dodge and burn
“In the beginning God said, the four-dimensional divergence of an antisymmetric, second rank tensor equals zero, and there was light, and it was good. And on the seventh day he rested.”- Michio Kaku
Re: Q&A: Map Making TTT (Tips, Tricks & Tutorials)
yea im working on how to extend it for applying grain in inkscape for texture, and something likewise in GIMP, and ive come close to getting water depthDiM wrote:extend both tutorials by applying grain on the land (to give it a grassy feel) and add depth to the water and land by using dodge and burn
btw the dodge and burn in GIMP sucks, and is non-existant in inkscape
Re: Q&A: Map Making TTT (Tips, Tricks & Tutorials)
ok, with some toying and messing around, i have figured out....
How to make a O.K. looking fantasy world/map using both GIMP & Inkscape
Note: You will want to save a bit, cause for some reason (at least for me) every once in a while X-11 will crash, taking all your unsaved work with it. And save it as a .xcf, or .psd
Note 2: Sometimes X-11 is called XQuartz
Note 3: You must have Inkscape and GIMP for this
Part 1, making the land:
OK, to start, bring up GIMP
Once up, select new and choose your dimensions (im gonna be using 600x600)
Fill the background with a green color
Once done, your gonna need a grass texture. An easy way to make an O.K. looking texture is to do this:
Create a new layer
Choose the Paintbrush tool
Choose a 1 pixel brush
Set the jitter to 50
Set the color to a dark green or black
Draw up and down, back and forth on the new layer until you have millions of spots all over the green (hopefully u did this on your new layer, not the background)
Now set the new layer to overlay
mess around with the opacity until it looks o.k. (I have it set to 10.9)
OK now that you have your texture and grass, you need water. Open Inkscape
Make a green box
Select the box, and make sure its the same dimensions as yours is in GIMP
Now draw your water on, i suggest you use a really dark blue, like this:
BLUE BLUE BLUE
After you have done that, delete the green box that the water is on
Now select your water, and do the following:
File: Export Bitmap
and choose what u want to name it
Now close down Inkscape, u wont be using it for a while yet.
Go back to GIMP, and on your opened grass picture with texture, go under:
File: Open as layers
and choose the water picture u made
Now you water will probably be all in the center of the picture, using the Move tool, move the water to your desired location.
If it fits where its supposed to, great, if not, do the following:
Select your water layer
Put it so that its roughly in the right spot
Use the Scale Tool to scale it so it fits
Now do get depth in the water, select the Airbrush tool and change the color to one that is a little lighter than the water color. Now color along the shore with a large fuzzy brush, until it looks good. It doesnt matter if you accidentally draw on the land.. Now in the areas of your water that are FAR AWAY from the shore, use a smaller fuzzy brush (still with air brush) and a really dark blue color and color in there. Then if it doesnt look that good, use a fuzzy brush and use the Blur tool to make it look better
OK now once done with that, if u got some blue on the land, its time to go in there and erase it off the land, to do so, i suggest
under the Eraser tool, change the brush to Circle (11) brush, and change the scale to 1.45.
on your map, zoom into 400%
erase the blue off the land, but dont erase the water!
Note: if you zoom in to 800% you can get even closer, and not ruin the water
O.K. now go back through my tutorials, and look for the landscaping in GIMP tutorial
If your doing it right so far, it will be looking something like this:
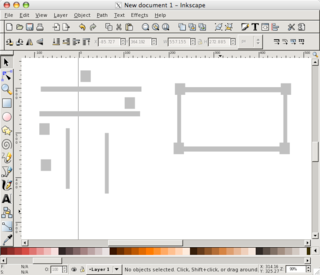
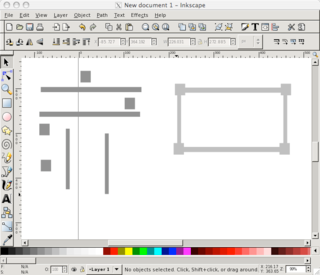
Part 2, Adding Castles:
OK if you've closed Inkscape, bring it up
Now open your current fantasy map, so that u know where u would be placing it (u will have to have saved it as a .png to open it)
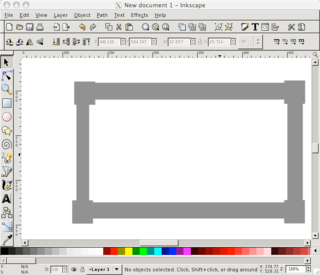
Using the Squares and Rectangles tool, create a square that u want in the basic shape/size of your castle.
Now assuming that Inkscape does what always does to me, u should now have a colored square.
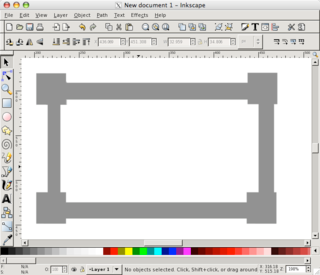
Next, make four squares of the same or about the same size on the corners of your square. Those will be your towers.
Now delete your original square, u wont be needing that now
Once its deleted, make rectangles that go between each of towers for walls (but only 1 rectangle between 2 towers!)
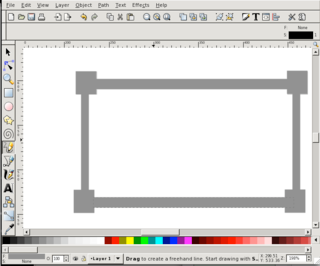
Once u have done that, u should have the basic shape of a castle
If u want, u can get creative and create inner walls and such
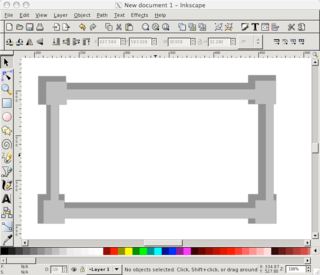
Oh and if u want to have it so that u can distinguish where your walls your walls end, then here are some ways to do it:
1) Make the walls lighter in color than the towers, or reverse
2) Add a thin line around the towers by doing the following:
Select the tower
Bring up the Fill and Stroke window
Go under the Stroke Paint tab
Select the square that is right next to the giant X
Go under the Stroke Style tab
Change the width to a low number (0.5 or less should do)
Repeat for each tower
Note: You usually want the walls smaller in than the towers, and a way to keep the towers the exact same size, is to make 1 tower and copy it the desired amount of time. Also, if u do the first suggestion, then make sure that the wall is below the tower
Now if u did that right, u should have a nice/O.K looking castle, and u can create as many castles that u want that way.
Now to get it over to GIMP
Delete the background picture
Select the castle(s) you created
Go under File: Export Bitmap
Name the file
Hit Export
Once done, on GIMP, do the following:
File: Open as Layers
and choose your file. Be sure to move it around so that each is in the area u had it in.
Note: If you have more than 1 castle and u want to move each around individually, u can either export them all individually, or once u opened the picture as layer(s), copy it the same amount of time as there are castles, and make sure that there is only 1 castle on each layer, and that they are all different.
WARNING!
Once you open the castles as layers, proceed with caution. Just a quick resize could make them look ugly!
Now to add a shadow:
GIMP way:
This part is tricky and i have not perfected it yet. Roughly, here is what u do:
Create a new layer behind the castles
Zoom in to the castles
Using a 1 pixel brush, draw where u think the shadow would be
Blur it
Repeat for all the castles
The shadow is the hardest, and if u want, u dont have to do it. Also, if u want, u can try to do it in Inkscape, which ill tell how in a minute.
If you did it about right, it should look something like this:

OK now if u think your castles look crappy after the shadow, then there is another way to do it
Inkscape Way:
OK if u closed down your Inkscape and got out of your castles, then bring inkscape back up and open your castles, or just make some new ones
Once done, you should again have your basic castle without a shadow or anything, this is what i do:
Zoom in alot
Go under
Edit: Copy: Paste
Do that once for every piece
so now u should have something like this:
OK now u need to get all those stray pieces where they belong. First tho, u have to be able to distinguish them from your original castle. So click down in a corner, and drag over all of the stray pieces so you have selected them, and then change their color to a darker shade of the same color as your original castle, so that it looks like this:
Now move each of the pieces so that they are above the original, and now u should have a dark castle, with none of your original showing.
Now this next step is hard, and i suggest u start with the walls. First, click a wall that is horizontal (left to right), and lets say your light source for your map is gonna be in the lower right corner. If so, then once you have selected it, there should be a bunch of arrows. Choose the arrow pointing straight up, and drag it up a ways
now do the same thing for the other horizontal wall, and you should have something like this:

Now for the vertical walls. Still assuming that the light is in the lower right corner, choose a vertical wall, and again u should see those arrows. Click and drag the one that is facing to the LEFT. Now repeat for the other vertical wall. You should now have this:
Ok now for the towers, click any tower. Now choose the arrow that is facing towards the left corner. Drag that a ways. Now repeat that for every tower, and u should have something like this:
Now click each of those pieces, and choose to Lower the Selection or the Page Down button on your keyboard. Now just modify your darker sections in size so that they look right. If done correctly, ur end result should be something like this:
Note: zoom out to 100% before you export it, to make sure the castle is the size u want. If not, then select the whole castle, and using the arrows to make it the size u want
At that point, just select the whole castle, and export it. Then bring it up in GIMP using the Open as Layers, and move the castle(s) around to the right spot.
You should now have it looking like this:

And be creative with your castles! dont just do bland boring square and rectangle ones! add inner walls, inner towers, do circle ones even! and done just use grey, try using oranges and browns!
Hopefully your castles will look better!
Part 3, adding a desert (optional):
OK I know that alot lately there have been maps starting to use deserts, and its been annoying me that I couldnt make such good looking deserts. But I put my mind to it, and finally figured out how to.
In GIMP, make a new layer (I find that 50x43 works well)
Fill that layer with white
Do the following:
Filters: Noise: RGB Noise
Now a little preview will come up, uncheck all the boxes except for the preview box
Now take up the Red, Green, Blue, and Alpha all the way up. You should now see in the preview area your box filled with black and white noise.
Hit OK
Your box should now be filled with black and white, but your not done yet, click the Scale tool
Now click your box
Once clicked, it should show a bunch of squares in the different areas. Pull on the squares until the size of your noise layer has a width of 1313 and a height of 659
Note: use the squares, dont just go under scale layer and change it
Now You should have a giant layer full of noise over your entire picture. If you do, your on the right track.
Set your noise layer to Overlay mode, and the Opacity to somewhere between 40 and 60
Create a layer behind the noise layer, and on that layer, draw behind your noise layer with the color of sand in the area that you want your desert. Be sure to use a fuzzy brush, fuzzy (19) brush works well. In that area it should have a nice looking desert, so now take an eraser over the extra parts of the noise layer that are not on the desert. If done correctly, it should look something like this:
Part 4 Coming soon!
Part 4, adding food resources (optional):
OK creating simple resources is easy. First, using the Paintbrush tool, change the brush to Pencil Sketch#1
Then, choose the color u want your resource
Now just click where u want it
Note: It wont always place it in the way the brush is facing
Now create a new layer behind your resource layer
On that layer, use a fuzzy brush to put some dark green behind the pencil sketch.
Now to add a fence, create a new layer above the resource
Zoom in above the resource to about 800%
Set the color to brown
Use a 1 pixel brush now, and around the resource, make a bunch of small lines, each being about 2-4 pixels long, with about 2-3 pixels between each. If u did it correctly, it should look something like this:

Part 5, adding signs of life:
For this part, when I say 'adding signs of life', I dont mean villages.... yet
First off, lets start by adding some boats
Create a new layer (above the water layer)
Zoom in above the water
Select a 1 pixel paintbrush
Change the color to brown
Draw the relative shape of a fishing boat
Now you'll need a sail
Change the color to white
Using your 1 pixel brush, draw a triangle
Note: You need to make sure that the triangle sides are mostly straight. To do this, click at a spot, and then hold shift. This will allow you to make straight lines.
If you want, you can create a new layer for the sails
Repeat until you have your desired amount of boats
That is a way you can do it in GIMP, I have noticed tho that the ships made that way are usually more pixely. If u dont want them pixely, then make them in Inkscape, to do that, do this:
Open Inkscape
Using the Freehand tool, draw the relative shape of a boat (minus the sail)
Draw a triangle for a sail
Select the boat shape and choose a brown color for it
Select the sail and choose a white color for it
Repeat for desired amount of boats
Then do the usual File: Export and opening as layers. If your boats are to large once you've done that, then use the scale tool to scale them down to size.
Now to add some ports, again u can do this in both GIMP and Inkscape, here are the 2 ways
GIMP:
Zoom in to along the shore after creating a new layer
Use a brown 1 or 5 pixel brush, and be sure to use shift to make straight lines.
Draw a dock
Inkscape:
Open your picture after saving it as a .png
Use the Freehand tool or the Square and Rectangle tool to make straight lines/docks
Delete the background picture
Export, open as layers
Scale down to the right size
OK so its kinda hard to explain, but really easy to draw
Now you should have some boats and a dock for them to go from, now to add a road.
Create a new layer (make sure its just above the grass and grass texture, nothing else)
Use a brown or light brown color and draw using a fuzzy paintbrush, you can use any size u want, but dont make it to big
Draw where you want the road to be
Change the opacity of the road to somewhere between 10 and 60
Now you might want to draw something more, lets go with sheep for now.
Create a new layer
Use a Circle fuzzy paintbrush, make sure its small, and that the color is on white
Draw short lines for sheep
Scale the layer so that the sheep are about the appropriate size
Now to fence them in
Create a new layer if u like
Zoom in around the sheep, and use the same technique u used for the resource fence, and you can fence them in in a square or circle, whichever you prefer
And there you have it, some signs of life. If you did it right, it will look something like this:

Note: The dock/boats in the upper water area was created in GIMP, and the ones in the lower water area were created in Inkscape
Look for the next part soon!
Part 6, Adding hills (optional, although i mostly suggest u skip this step):
OK if your like me, you'll be thinking that the land looks rather flat. The way to fix that, is the same way we gave the shore an upraised look. The only difference is, we're gonna use that technique to create hills
Choose your color (light green for the light parts, dark green/black for the dark parts)
Choose your fuzzy paintbrush (if your hill is small, then use a smaller brush, a (3) or (5), if its large, then try a (19))
Create a new layer, but make sure its between the grass and the texture layers
Zoom in a lot, 400% or 800% should suffice
Draw your hill
Its really hard to do for small hills, so im going to do a large hill in the upper left corner.
OK after a little bit, you will realize that making hills is really difficult. I cant even do it that well! Although i did manage to create a big lump....
so yea u dont have to try making hills if u dont want to, for me its a big pain
Part 7, How to make a village:
There are many ways to make villages, here are some of them
Open Inkscape
Make a square, and change the color to a nice house like color
Using the freehand tool, make a shape like < and > and place them at the ends of the house
Now make a straight line between them
Repeat for the amount of houses you want
Export
Open as layers in GIMP
Use the scale tool to make sure its the right size
Move it to the right spot
Note: If u resize it, it might get blurry, so i suggest that you make sure its the right size in Inkscape before u export it
_______________________________________________
You can also do the same basic thing in GIMP.
Also, here is a way kinda like how mibi did in an earlier tutorial:
Create a new layer
Zoom in alot
Draw the shape(s) of houses
Use a 1 pixel brown brush or pencil, and while holding shift, make the outline of the house, but ON the house
Now do the same >-< thing that u did with the inkscape houses, but change the color to black, and set the Paintbrush Mode to overlay
Scale it down to the appropriate size
Note: After you draw the house, i suggest u use a 1 pixel pencil for the rest
Now to add smoke from a chimney:
Choose a white/grey/smoke color
Chose a small fuzzy paintbrush
Zoom in
Start at around a 1 pixel area from a house, and the farther u get, the fatter you should have it, like this kinda:
...:::
or something like that
Now get a blur tool, and blur over the smoke
Now to have it seem kinda like the smoke is disappearing the farther it gets
Go to the END of the smoke (not the point u started it from) and use the blur tool ALOT
You should now have a some nice looking smoke
Note: The wind will change over distance, so if u have a big map, dont have the smoke all going the same way
Now you may want to add a fence area next to a house, heres how:
Create a new layer behind your village layer
Using a brown pencil, from about half way down the house make a line that goes out a ways
Now make that line do a left/right turn (a sharp one like this: |_ not like this (_ )
Go down/up past the house
Do another turn like that
Make the length of this part of the fence the same as the original line (make sure these to are parallel like this:||)
Go until u reach about the area of a corner of the house, and u should be below it, so do another sharp turn and go and connect to it
If done correctly, u should have a nice looking fence that you can put animals in (like sheep from earlier)
Note: If you feel like it, change the pencils mess around with the pencils opacity, or the fence layers opacity
Now to have fire from a smokestack (im assuming i got that right, basically from one of those big burn piles with sticks stacked up and such)
Ok zoom in to 800%
Create a new layer
Change the color to grey (like rocks)
Using a 1 pixel pencil, do individual pixels for rocks in a circle (actually, just 4 groups of 2 pixels each with none of the groups touching but with 4 pixels in the center of it all should work)
Color the center between the pixels red with a red paintbrush
Now do half the pixels of the inside with orange
Make a new layer and have smoke coming from the fire (same way as the villages)
If done correctly, you should have something looking like this:
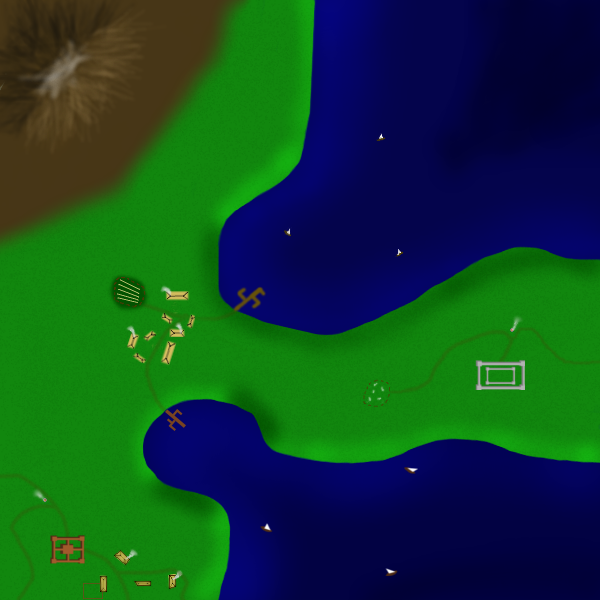
So yea you should now have your villages the fire pits thingys are at the cross roads (or at least 2 of them), the village down at the bottom is the one i made in GIMP, and the other one I made in Inkscape, and the fence is at a house in the GIMP village
________________________________________________________________________________________________
Before I finish up this part, there is 1 more type of village you can make, it is tricky tho.
And before I start on how to make this type of village, I would like to thank gimil for telling me how to do it, so I could modify it for GIMP
In GIMP, create a new layer
In this layer, using a tanish brush, make some strange blob like shapes (but contained blobs, not ones with a ton of curves)
Do this a couple of times, 3 of 4 should do (but be sure to do this all on 1 layer!)
Now, go under Filters: Distorts: Emboss
On the preview, make sure u can see your 'blobs'
Now change the settings to as follows:
The Bumpmap box checked
Azimuth: Any of your liking
Elevation: 44.08
Depth: 2
Then click OK
Now you should have some elevated looking blobs, now heres what to do to make them look kinda like the ones in Feudal War
Using the SCALE TOOL, scale the layer down so that the blobs are really small (like this size: <>, each)
Now under the layers window/tab, keep copying your layer with the original blobs, and move the copied layers around so that none overlap and so that you have something that looks like one of the villages in Feudal
Now just merge all the village layers together, and add smoke! You should now have a nice looking Feudal Wars type village, which btw ill include mine in the end of part 8
And again, thanks gimil for telling me how!
Part 8 coming soon!
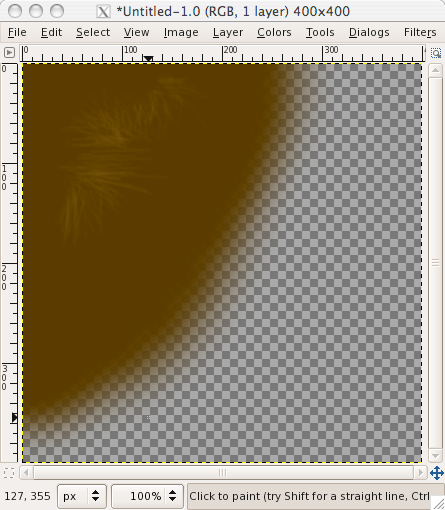
Part 8, making a mountain (optional, but good to learn)
OK if you were wondering why I have a mountain in the last one without telling you how to do it, its cause i was to lazy to make that layer invisible
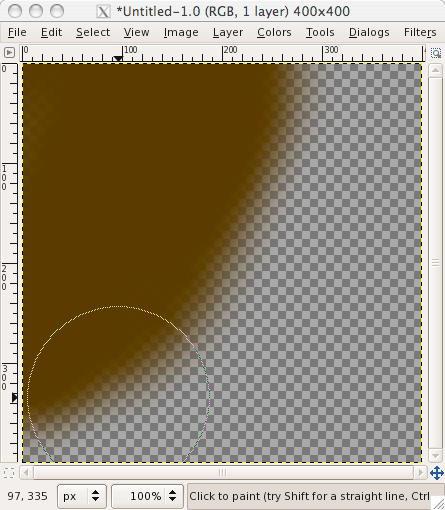
Now in this part, I shall tell you how to do it! And since its really hard, Ill even use pictures!
Note: Im gonna start a new image to show you how to do this, then have about the same picture with the mountain from last time shown
Create a new layer
Using a fuzzy paintbrush and a nice brown color, draw a brown area
Now create a new layer
Get a small (circle 3-circle 10) airbrush, and choose a lighter brown color
Set the settings to around this:
Rate: 24.8
Pressure: 3.3
Now for the side thats facing your light source, do fast up and down (or diagonal) strokes, the longer the strokes, the steeper/longer your mountain, and every once in a while change the size of your brush
Create another new layer
Now do the same for the dark side as you did for the light side, but with a dark color
Now create another new layer
Change the color to whitish
Get a fuzzy brush (any size i guess)
Draw along the top for snow
Now you may want to go through the layers and blur it a little
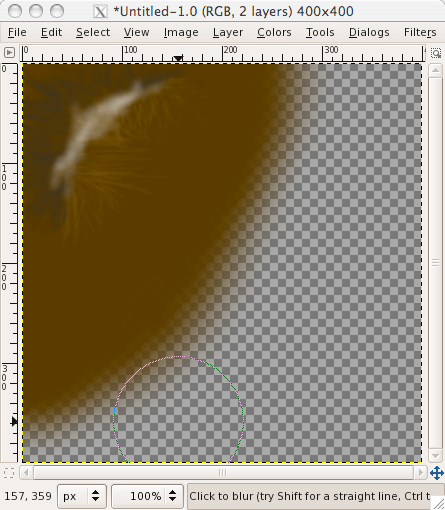
Sorry if it ends up looking worse than my original, just keeping playing around with the rate and pressure and you should eventually get it
Note: also, try using differnet brushes
oh and now for that picture with the feudal type villages:

And there you should have it, a whole fantasy world of your creation
Part 9, converting it into a map:
OK now if you want to convert it into a map, heres wat you will need to do:
Add a legend
Add borders
Add bonuses
Add starting points (optional)
Come up with some unique gameplay
Now lets start with adding a legend
Legends can be at the bottom, top, or anywhere on the map! But for now, we shall just tell you how to do it on the bottom/top
The maximum size restrictions for a small map are 630x600 pixels, and we're gonna have the legend on the bottom, and 100x500 pixels should be enough. But we will have to change the image size for the legend to work, heres what we shall do:
Go under Image: Scale Image
and since we want for now about 100 pixels tall for the legend, lets scale it to 500x500 if u have a 600x600 picture. If you have a large 800x800 map, then 700x700.
Now go under Image: Canvas Size, and change the height back to what it originaly was, but not the width
Now GIMP should have automatically moved your image up, and you should now have a 100x500 pixel area for your legend. If you want your legend at the top, then move every layer carefully down to the bottom
Now create a new layer BEHIND EVERYTHING!
Use the bucket fill to fill that layer with whatever color you want (im gonna use grey)
Now you have a legend, in the next part, ill tell you what to put in it
Now for some territory borders, i suggest u make these in Inkscape
Bring up inkscape
Open up your map as a .png
Using the Freehand tool, draw some borders. You dont want them all straight, and you dont want them to complex. I suggest doing a little of each. Also, you usually want to keep your castles/villages in one territory (not ALL the castles and villages, but the individual ones)
Zoom in, and using the Node Modifier Tool modify the nodes of each of the lines so that they look good to u
Export the BORDERS ONLY and then open them as layers in GIMP
Move them around so that they fit right, also scaling if needed, and erasing a little as needed
You will also want to come up with fantasy names for territories. Otherwise, you could do numbering. There are some websites out there that can come up with fantasy names for you so that you dont have to work that hard at it
If done correctly, you should have something like this:
I had to draw the borders up quickly, but if your good and careful, then you can do better ones. Also, I didnt add names.
Part 10, coming up with bonuses/unique gameplay:
OK coming up with good bonuses is usually easy if you have starting points. If u have starting points, then good bonuses are usually as follows:
Castles:
4, 5, or 6
Villages:
1, 2, 3 or 4
Now coming up with some unique gameplay is harder. You could do something like everybody has to try and stop a dragon, or something like my Empire Builder map (going under a name change) with each regular territory being -1, or anything like that. So coming up with gameplay is something you have to do. Occasionally, people add in quotes.
Once you have all that done, you want to explain it well. If its not explained well, then its more likely that people want like it. So you want to use concise wording that isnt confusing. Once done, make sure you have yours bonuses/gameplay in your legend, with the title anywhere on the map
If done correctly, you should have something like this:

I hope you enjoyed my tutorial, and congratz if u made it all the way through


also, here my file if u want it:
XCF:
http://www.fileden.com/files/2008/5/13/ ... xample.xcf
PSD:
http://www.fileden.com/files/2008/5/13/ ... xample.psd
How to make a O.K. looking fantasy world/map using both GIMP & Inkscape
Note: You will want to save a bit, cause for some reason (at least for me) every once in a while X-11 will crash, taking all your unsaved work with it. And save it as a .xcf, or .psd
Note 2: Sometimes X-11 is called XQuartz
Note 3: You must have Inkscape and GIMP for this
Part 1, making the land:
OK, to start, bring up GIMP
Once up, select new and choose your dimensions (im gonna be using 600x600)
Fill the background with a green color
Once done, your gonna need a grass texture. An easy way to make an O.K. looking texture is to do this:
Create a new layer
Choose the Paintbrush tool
Choose a 1 pixel brush
Set the jitter to 50
Set the color to a dark green or black
Draw up and down, back and forth on the new layer until you have millions of spots all over the green (hopefully u did this on your new layer, not the background)
Now set the new layer to overlay
mess around with the opacity until it looks o.k. (I have it set to 10.9)
OK now that you have your texture and grass, you need water. Open Inkscape
Make a green box
Select the box, and make sure its the same dimensions as yours is in GIMP
Now draw your water on, i suggest you use a really dark blue, like this:
BLUE BLUE BLUE
After you have done that, delete the green box that the water is on
Now select your water, and do the following:
File: Export Bitmap
and choose what u want to name it
Now close down Inkscape, u wont be using it for a while yet.
Go back to GIMP, and on your opened grass picture with texture, go under:
File: Open as layers
and choose the water picture u made
Now you water will probably be all in the center of the picture, using the Move tool, move the water to your desired location.
If it fits where its supposed to, great, if not, do the following:
Select your water layer
Put it so that its roughly in the right spot
Use the Scale Tool to scale it so it fits
Now do get depth in the water, select the Airbrush tool and change the color to one that is a little lighter than the water color. Now color along the shore with a large fuzzy brush, until it looks good. It doesnt matter if you accidentally draw on the land.. Now in the areas of your water that are FAR AWAY from the shore, use a smaller fuzzy brush (still with air brush) and a really dark blue color and color in there. Then if it doesnt look that good, use a fuzzy brush and use the Blur tool to make it look better
OK now once done with that, if u got some blue on the land, its time to go in there and erase it off the land, to do so, i suggest
under the Eraser tool, change the brush to Circle (11) brush, and change the scale to 1.45.
on your map, zoom into 400%
erase the blue off the land, but dont erase the water!
Note: if you zoom in to 800% you can get even closer, and not ruin the water
O.K. now go back through my tutorials, and look for the landscaping in GIMP tutorial
If your doing it right so far, it will be looking something like this:
Part 2, Adding Castles:
OK if you've closed Inkscape, bring it up
Now open your current fantasy map, so that u know where u would be placing it (u will have to have saved it as a .png to open it)
Using the Squares and Rectangles tool, create a square that u want in the basic shape/size of your castle.
Now assuming that Inkscape does what always does to me, u should now have a colored square.
Next, make four squares of the same or about the same size on the corners of your square. Those will be your towers.
Now delete your original square, u wont be needing that now
Once its deleted, make rectangles that go between each of towers for walls (but only 1 rectangle between 2 towers!)
Once u have done that, u should have the basic shape of a castle
If u want, u can get creative and create inner walls and such
Oh and if u want to have it so that u can distinguish where your walls your walls end, then here are some ways to do it:
1) Make the walls lighter in color than the towers, or reverse
2) Add a thin line around the towers by doing the following:
Select the tower
Bring up the Fill and Stroke window
Go under the Stroke Paint tab
Select the square that is right next to the giant X
Go under the Stroke Style tab
Change the width to a low number (0.5 or less should do)
Repeat for each tower
Note: You usually want the walls smaller in than the towers, and a way to keep the towers the exact same size, is to make 1 tower and copy it the desired amount of time. Also, if u do the first suggestion, then make sure that the wall is below the tower
Now if u did that right, u should have a nice/O.K looking castle, and u can create as many castles that u want that way.
Now to get it over to GIMP
Delete the background picture
Select the castle(s) you created
Go under File: Export Bitmap
Name the file
Hit Export
Once done, on GIMP, do the following:
File: Open as Layers
and choose your file. Be sure to move it around so that each is in the area u had it in.
Note: If you have more than 1 castle and u want to move each around individually, u can either export them all individually, or once u opened the picture as layer(s), copy it the same amount of time as there are castles, and make sure that there is only 1 castle on each layer, and that they are all different.
WARNING!
Once you open the castles as layers, proceed with caution. Just a quick resize could make them look ugly!
Now to add a shadow:
GIMP way:
This part is tricky and i have not perfected it yet. Roughly, here is what u do:
Create a new layer behind the castles
Zoom in to the castles
Using a 1 pixel brush, draw where u think the shadow would be
Blur it
Repeat for all the castles
The shadow is the hardest, and if u want, u dont have to do it. Also, if u want, u can try to do it in Inkscape, which ill tell how in a minute.
If you did it about right, it should look something like this:
OK now if u think your castles look crappy after the shadow, then there is another way to do it
Inkscape Way:
OK if u closed down your Inkscape and got out of your castles, then bring inkscape back up and open your castles, or just make some new ones
Once done, you should again have your basic castle without a shadow or anything, this is what i do:
Zoom in alot
Go under
Edit: Copy: Paste
Do that once for every piece
so now u should have something like this:
OK now u need to get all those stray pieces where they belong. First tho, u have to be able to distinguish them from your original castle. So click down in a corner, and drag over all of the stray pieces so you have selected them, and then change their color to a darker shade of the same color as your original castle, so that it looks like this:
Now move each of the pieces so that they are above the original, and now u should have a dark castle, with none of your original showing.
Now this next step is hard, and i suggest u start with the walls. First, click a wall that is horizontal (left to right), and lets say your light source for your map is gonna be in the lower right corner. If so, then once you have selected it, there should be a bunch of arrows. Choose the arrow pointing straight up, and drag it up a ways
now do the same thing for the other horizontal wall, and you should have something like this:
Now for the vertical walls. Still assuming that the light is in the lower right corner, choose a vertical wall, and again u should see those arrows. Click and drag the one that is facing to the LEFT. Now repeat for the other vertical wall. You should now have this:
Ok now for the towers, click any tower. Now choose the arrow that is facing towards the left corner. Drag that a ways. Now repeat that for every tower, and u should have something like this:
Now click each of those pieces, and choose to Lower the Selection or the Page Down button on your keyboard. Now just modify your darker sections in size so that they look right. If done correctly, ur end result should be something like this:
Note: zoom out to 100% before you export it, to make sure the castle is the size u want. If not, then select the whole castle, and using the arrows to make it the size u want
At that point, just select the whole castle, and export it. Then bring it up in GIMP using the Open as Layers, and move the castle(s) around to the right spot.
You should now have it looking like this:
And be creative with your castles! dont just do bland boring square and rectangle ones! add inner walls, inner towers, do circle ones even! and done just use grey, try using oranges and browns!
Hopefully your castles will look better!
Part 3, adding a desert (optional):
OK I know that alot lately there have been maps starting to use deserts, and its been annoying me that I couldnt make such good looking deserts. But I put my mind to it, and finally figured out how to.
In GIMP, make a new layer (I find that 50x43 works well)
Fill that layer with white
Do the following:
Filters: Noise: RGB Noise
Now a little preview will come up, uncheck all the boxes except for the preview box
Now take up the Red, Green, Blue, and Alpha all the way up. You should now see in the preview area your box filled with black and white noise.
Hit OK
Your box should now be filled with black and white, but your not done yet, click the Scale tool
Now click your box
Once clicked, it should show a bunch of squares in the different areas. Pull on the squares until the size of your noise layer has a width of 1313 and a height of 659
Note: use the squares, dont just go under scale layer and change it
Now You should have a giant layer full of noise over your entire picture. If you do, your on the right track.
Set your noise layer to Overlay mode, and the Opacity to somewhere between 40 and 60
Create a layer behind the noise layer, and on that layer, draw behind your noise layer with the color of sand in the area that you want your desert. Be sure to use a fuzzy brush, fuzzy (19) brush works well. In that area it should have a nice looking desert, so now take an eraser over the extra parts of the noise layer that are not on the desert. If done correctly, it should look something like this:
Part 4 Coming soon!
Part 4, adding food resources (optional):
OK creating simple resources is easy. First, using the Paintbrush tool, change the brush to Pencil Sketch#1
Then, choose the color u want your resource
Now just click where u want it
Note: It wont always place it in the way the brush is facing
Now create a new layer behind your resource layer
On that layer, use a fuzzy brush to put some dark green behind the pencil sketch.
Now to add a fence, create a new layer above the resource
Zoom in above the resource to about 800%
Set the color to brown
Use a 1 pixel brush now, and around the resource, make a bunch of small lines, each being about 2-4 pixels long, with about 2-3 pixels between each. If u did it correctly, it should look something like this:
Part 5, adding signs of life:
For this part, when I say 'adding signs of life', I dont mean villages.... yet
First off, lets start by adding some boats
Create a new layer (above the water layer)
Zoom in above the water
Select a 1 pixel paintbrush
Change the color to brown
Draw the relative shape of a fishing boat
Now you'll need a sail
Change the color to white
Using your 1 pixel brush, draw a triangle
Note: You need to make sure that the triangle sides are mostly straight. To do this, click at a spot, and then hold shift. This will allow you to make straight lines.
If you want, you can create a new layer for the sails
Repeat until you have your desired amount of boats
That is a way you can do it in GIMP, I have noticed tho that the ships made that way are usually more pixely. If u dont want them pixely, then make them in Inkscape, to do that, do this:
Open Inkscape
Using the Freehand tool, draw the relative shape of a boat (minus the sail)
Draw a triangle for a sail
Select the boat shape and choose a brown color for it
Select the sail and choose a white color for it
Repeat for desired amount of boats
Then do the usual File: Export and opening as layers. If your boats are to large once you've done that, then use the scale tool to scale them down to size.
Now to add some ports, again u can do this in both GIMP and Inkscape, here are the 2 ways
GIMP:
Zoom in to along the shore after creating a new layer
Use a brown 1 or 5 pixel brush, and be sure to use shift to make straight lines.
Draw a dock
Inkscape:
Open your picture after saving it as a .png
Use the Freehand tool or the Square and Rectangle tool to make straight lines/docks
Delete the background picture
Export, open as layers
Scale down to the right size
OK so its kinda hard to explain, but really easy to draw
Now you should have some boats and a dock for them to go from, now to add a road.
Create a new layer (make sure its just above the grass and grass texture, nothing else)
Use a brown or light brown color and draw using a fuzzy paintbrush, you can use any size u want, but dont make it to big
Draw where you want the road to be
Change the opacity of the road to somewhere between 10 and 60
Now you might want to draw something more, lets go with sheep for now.
Create a new layer
Use a Circle fuzzy paintbrush, make sure its small, and that the color is on white
Draw short lines for sheep
Scale the layer so that the sheep are about the appropriate size
Now to fence them in
Create a new layer if u like
Zoom in around the sheep, and use the same technique u used for the resource fence, and you can fence them in in a square or circle, whichever you prefer
And there you have it, some signs of life. If you did it right, it will look something like this:
Note: The dock/boats in the upper water area was created in GIMP, and the ones in the lower water area were created in Inkscape
Look for the next part soon!
Part 6, Adding hills (optional, although i mostly suggest u skip this step):
OK if your like me, you'll be thinking that the land looks rather flat. The way to fix that, is the same way we gave the shore an upraised look. The only difference is, we're gonna use that technique to create hills
Choose your color (light green for the light parts, dark green/black for the dark parts)
Choose your fuzzy paintbrush (if your hill is small, then use a smaller brush, a (3) or (5), if its large, then try a (19))
Create a new layer, but make sure its between the grass and the texture layers
Zoom in a lot, 400% or 800% should suffice
Draw your hill
Its really hard to do for small hills, so im going to do a large hill in the upper left corner.
OK after a little bit, you will realize that making hills is really difficult. I cant even do it that well! Although i did manage to create a big lump....
so yea u dont have to try making hills if u dont want to, for me its a big pain
Part 7, How to make a village:
There are many ways to make villages, here are some of them
Open Inkscape
Make a square, and change the color to a nice house like color
Using the freehand tool, make a shape like < and > and place them at the ends of the house
Now make a straight line between them
Repeat for the amount of houses you want
Export
Open as layers in GIMP
Use the scale tool to make sure its the right size
Move it to the right spot
Note: If u resize it, it might get blurry, so i suggest that you make sure its the right size in Inkscape before u export it
_______________________________________________
You can also do the same basic thing in GIMP.
Also, here is a way kinda like how mibi did in an earlier tutorial:
Create a new layer
Zoom in alot
Draw the shape(s) of houses
Use a 1 pixel brown brush or pencil, and while holding shift, make the outline of the house, but ON the house
Now do the same >-< thing that u did with the inkscape houses, but change the color to black, and set the Paintbrush Mode to overlay
Scale it down to the appropriate size
Note: After you draw the house, i suggest u use a 1 pixel pencil for the rest
Now to add smoke from a chimney:
Choose a white/grey/smoke color
Chose a small fuzzy paintbrush
Zoom in
Start at around a 1 pixel area from a house, and the farther u get, the fatter you should have it, like this kinda:
...:::
or something like that
Now get a blur tool, and blur over the smoke
Now to have it seem kinda like the smoke is disappearing the farther it gets
Go to the END of the smoke (not the point u started it from) and use the blur tool ALOT
You should now have a some nice looking smoke
Note: The wind will change over distance, so if u have a big map, dont have the smoke all going the same way
Now you may want to add a fence area next to a house, heres how:
Create a new layer behind your village layer
Using a brown pencil, from about half way down the house make a line that goes out a ways
Now make that line do a left/right turn (a sharp one like this: |_ not like this (_ )
Go down/up past the house
Do another turn like that
Make the length of this part of the fence the same as the original line (make sure these to are parallel like this:||)
Go until u reach about the area of a corner of the house, and u should be below it, so do another sharp turn and go and connect to it
If done correctly, u should have a nice looking fence that you can put animals in (like sheep from earlier)
Note: If you feel like it, change the pencils mess around with the pencils opacity, or the fence layers opacity
Now to have fire from a smokestack (im assuming i got that right, basically from one of those big burn piles with sticks stacked up and such)
Ok zoom in to 800%
Create a new layer
Change the color to grey (like rocks)
Using a 1 pixel pencil, do individual pixels for rocks in a circle (actually, just 4 groups of 2 pixels each with none of the groups touching but with 4 pixels in the center of it all should work)
Color the center between the pixels red with a red paintbrush
Now do half the pixels of the inside with orange
Make a new layer and have smoke coming from the fire (same way as the villages)
If done correctly, you should have something looking like this:
So yea you should now have your villages
________________________________________________________________________________________________
Before I finish up this part, there is 1 more type of village you can make, it is tricky tho.
And before I start on how to make this type of village, I would like to thank gimil for telling me how to do it, so I could modify it for GIMP
In GIMP, create a new layer
In this layer, using a tanish brush, make some strange blob like shapes (but contained blobs, not ones with a ton of curves)
Do this a couple of times, 3 of 4 should do (but be sure to do this all on 1 layer!)
Now, go under Filters: Distorts: Emboss
On the preview, make sure u can see your 'blobs'
Now change the settings to as follows:
The Bumpmap box checked
Azimuth: Any of your liking
Elevation: 44.08
Depth: 2
Then click OK
Now you should have some elevated looking blobs, now heres what to do to make them look kinda like the ones in Feudal War
Using the SCALE TOOL, scale the layer down so that the blobs are really small (like this size: <>, each)
Now under the layers window/tab, keep copying your layer with the original blobs, and move the copied layers around so that none overlap and so that you have something that looks like one of the villages in Feudal
Now just merge all the village layers together, and add smoke! You should now have a nice looking Feudal Wars type village, which btw ill include mine in the end of part 8
And again, thanks gimil for telling me how!
Part 8 coming soon!
Part 8, making a mountain (optional, but good to learn)
OK if you were wondering why I have a mountain in the last one without telling you how to do it, its cause i was to lazy to make that layer invisible
Now in this part, I shall tell you how to do it! And since its really hard, Ill even use pictures!
Note: Im gonna start a new image to show you how to do this, then have about the same picture with the mountain from last time shown
Create a new layer
Using a fuzzy paintbrush and a nice brown color, draw a brown area
Now create a new layer
Get a small (circle 3-circle 10) airbrush, and choose a lighter brown color
Set the settings to around this:
Rate: 24.8
Pressure: 3.3
Now for the side thats facing your light source, do fast up and down (or diagonal) strokes, the longer the strokes, the steeper/longer your mountain, and every once in a while change the size of your brush
Create another new layer
Now do the same for the dark side as you did for the light side, but with a dark color
Now create another new layer
Change the color to whitish
Get a fuzzy brush (any size i guess)
Draw along the top for snow
Now you may want to go through the layers and blur it a little
Sorry if it ends up looking worse than my original, just keeping playing around with the rate and pressure and you should eventually get it
Note: also, try using differnet brushes
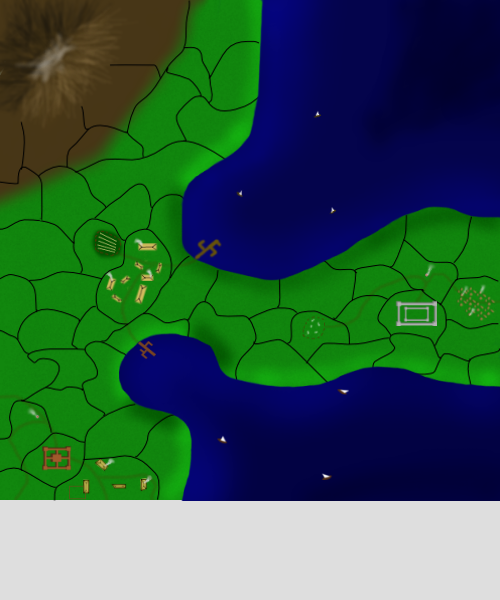
oh and now for that picture with the feudal type villages:
And there you should have it, a whole fantasy world of your creation
Part 9, converting it into a map:
OK now if you want to convert it into a map, heres wat you will need to do:
Add a legend
Add borders
Add bonuses
Add starting points (optional)
Come up with some unique gameplay
Now lets start with adding a legend
Legends can be at the bottom, top, or anywhere on the map! But for now, we shall just tell you how to do it on the bottom/top
The maximum size restrictions for a small map are 630x600 pixels, and we're gonna have the legend on the bottom, and 100x500 pixels should be enough. But we will have to change the image size for the legend to work, heres what we shall do:
Go under Image: Scale Image
and since we want for now about 100 pixels tall for the legend, lets scale it to 500x500 if u have a 600x600 picture. If you have a large 800x800 map, then 700x700.
Now go under Image: Canvas Size, and change the height back to what it originaly was, but not the width
Now GIMP should have automatically moved your image up, and you should now have a 100x500 pixel area for your legend. If you want your legend at the top, then move every layer carefully down to the bottom
Now create a new layer BEHIND EVERYTHING!
Use the bucket fill to fill that layer with whatever color you want (im gonna use grey)
Now you have a legend, in the next part, ill tell you what to put in it
Now for some territory borders, i suggest u make these in Inkscape
Bring up inkscape
Open up your map as a .png
Using the Freehand tool, draw some borders. You dont want them all straight, and you dont want them to complex. I suggest doing a little of each. Also, you usually want to keep your castles/villages in one territory (not ALL the castles and villages, but the individual ones)
Zoom in, and using the Node Modifier Tool modify the nodes of each of the lines so that they look good to u
Export the BORDERS ONLY and then open them as layers in GIMP
Move them around so that they fit right, also scaling if needed, and erasing a little as needed
You will also want to come up with fantasy names for territories. Otherwise, you could do numbering. There are some websites out there that can come up with fantasy names for you so that you dont have to work that hard at it
If done correctly, you should have something like this:
I had to draw the borders up quickly, but if your good and careful, then you can do better ones. Also, I didnt add names.
Part 10, coming up with bonuses/unique gameplay:
OK coming up with good bonuses is usually easy if you have starting points. If u have starting points, then good bonuses are usually as follows:
Castles:
4, 5, or 6
Villages:
1, 2, 3 or 4
Now coming up with some unique gameplay is harder. You could do something like everybody has to try and stop a dragon, or something like my Empire Builder map (going under a name change) with each regular territory being -1, or anything like that. So coming up with gameplay is something you have to do. Occasionally, people add in quotes.
Once you have all that done, you want to explain it well. If its not explained well, then its more likely that people want like it. So you want to use concise wording that isnt confusing. Once done, make sure you have yours bonuses/gameplay in your legend, with the title anywhere on the map
If done correctly, you should have something like this:
I hope you enjoyed my tutorial, and congratz if u made it all the way through
also, here my file if u want it:
XCF:
http://www.fileden.com/files/2008/5/13/ ... xample.xcf
PSD:
http://www.fileden.com/files/2008/5/13/ ... xample.psd
Last edited by bryguy on Tue May 13, 2008 11:42 am, edited 9 times in total.
-
Lone.prophet
- Posts: 1467
- Joined: Thu Oct 12, 2006 4:37 pm
- Location: Your basement Muahaha
my borders (mini tut)
ok gimil asked me how i did the gulfs border wel here is a minitut
1, i made the continents in illustrator
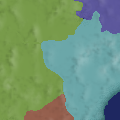
2, i make all borders in illustrator ( i think its a 2 pixel brush thoough it could be something in close)

back in photoshop:
3, i give the border a outer glow of white with noise set on overlay
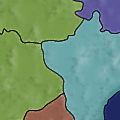
4, i do an apply image blur it a couple of times and set the layer to darken
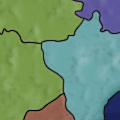
hope you liked it and learned something
1, i made the continents in illustrator
2, i make all borders in illustrator ( i think its a 2 pixel brush thoough it could be something in close)
back in photoshop:
3, i give the border a outer glow of white with noise set on overlay
4, i do an apply image blur it a couple of times and set the layer to darken
hope you liked it and learned something
Last edited by Lone.prophet on Mon May 12, 2008 10:29 am, edited 1 time in total.

Re: my borders (mini tut)
ew, blurred borders. Vector borders can be done faster in photoshop using the pen tool.
-
Lone.prophet
- Posts: 1467
- Joined: Thu Oct 12, 2006 4:37 pm
- Location: Your basement Muahaha

Re: my borders (mini tut)
one thing that ive learnt about lon.profet these past few months is that you have quite a short fuse...Lone.prophet wrote:omg ur an ass what was the neediness of that comment?
Re: my borders (mini tut)
Don't take this the wrong way - but I think that's one of the most interesting things you've ever posted.t-o-m wrote:one thing that ive learnt about lon.profet these past few months is that you have quite a short fuse...Lone.prophet wrote:omg ur an ass what was the neediness of that comment?
C.

Highest score : 2297
Re: my borders (mini tut)
umm how can i not take that the wrong way?yeti_c wrote:Don't take this the wrong way - but I think that's one of the most interesting things you've ever posted.t-o-m wrote:one thing that ive learnt about lon.profet these past few months is that you have quite a short fuse...Lone.prophet wrote:omg ur an ass what was the neediness of that comment?
C.
and in what way do you mean?
and have you ever bothered to read what ive ever posted?
Re: my borders (mini tut)
Looks really cool to me
Btw why dont u just post this in Map Making Tips Tricks and Tutorials?
Btw why dont u just post this in Map Making Tips Tricks and Tutorials?
Re: my borders (mini tut)
lol, your method is very inefficient and requires two expensive programs. Not to mention you blur the end result, why did people start doing that anyways?Lone.prophet wrote:omg ur an ass what was the neediness of that comment?
Here is my mini-tut
1. Trace borders with pen tool
2. Stroke path.
3. Step away from the computer.
that was how the Iraq borders were done.
Last edited by mibi on Mon May 12, 2008 12:09 pm, edited 1 time in total.
-
DiM
- Posts: 10415
- Joined: Wed Feb 14, 2007 6:20 pm
- Gender: Male
- Location: making maps for scooby snacks
Re: my borders (mini tut)
mibi wrote:lol, your method is very inefficient and requires two expensive programs. Not to mention you blue the end result, why did people start doing that anyways?Lone.prophet wrote:omg ur an ass what was the neediness of that comment?
Here is my mini-tut
1. Trace borders with pen tool
2. Stroke path.
3. Step away from the computer.
that was how the Iraq borders were done.
totally agree with mibi here. i have recently discovered how great the pen tool is. and if you also have a graphic tablet you can do wonders.
lone prophet, if you can't accept criticism then it's better to shut up.
“In the beginning God said, the four-dimensional divergence of an antisymmetric, second rank tensor equals zero, and there was light, and it was good. And on the seventh day he rested.”- Michio Kaku
-
Lone.prophet
- Posts: 1467
- Joined: Thu Oct 12, 2006 4:37 pm
- Location: Your basement Muahaha
Re: my borders (mini tut)
stfu all off you this was a request by gimil cause he liked my borders, if you dont like it this way stay out of this topic
-
Lone.prophet
- Posts: 1467
- Joined: Thu Oct 12, 2006 4:37 pm
- Location: Your basement Muahaha
Re: my borders (mini tut)
too bad those borders look choopy and pixelated, which totally sucksmibi wrote:lol, your method is very inefficient and requires two expensive programs. Not to mention you blur the end result, why did people start doing that anyways?Lone.prophet wrote:omg ur an ass what was the neediness of that comment?
Here is my mini-tut
1. Trace borders with pen tool
2. Stroke path.
3. Step away from the computer.
that was how the Iraq borders were done.